
It is a sad fact that most homeowners will wait until the middle of the rainy season or the occurrence of a major climatic event like Hurricane Sandy before they take the trouble of finding out whether their sump pumps are up to the task. This practice may make sense for household appliances that run every day or at least once a month, and hence, are tested during usage anyhow. Sump pumps, however, tend to remain inactive for months on end, and if during this time something goes wrong, even light rains can lead to a flooded basement. Learning how to test a sump pump and applying these skills, on the other hand, is a simple and highly risk-mitigating task. We’ve made it even easier by dividing the multiple testing methods into two – a quick test and another, thorough professional inspection process.
The Quick Testing Process:-
Before going into the more exact test procedure, it is important to know how to run a 2-minute test when the rains have already begun, and puddles are forming around the exterior of the basement.
To run this test:
Raise the sump cover a little and remove it if the discharge pipes do not hinder such removal. Disconnecting the pipes is neither necessary nor advisable since this might render the pump non-functional for some time and increase risks of flooding. Use a flashlight to quickly note if there are any bugs or worms in the sump. If there are, wear hand protection and apply some pest control measures.
Lower your hand till you find the float.
Raise the float a little and note whether the pump begins to run. The float should move freely, and you should be able to place at least two fingers between the float and the wall of the sump. Among the things you should remember when learning how to test a sump pump is never to push or pull the float too much as this might break it. If the float doesn’t move, it is probably jammed. If the float moves but the pump still does not start, either the switch arm is malfunctioning, or the motor is suffering from problems. Contact your plumbing contractor immediately.
For sump pumps that do not have a float:
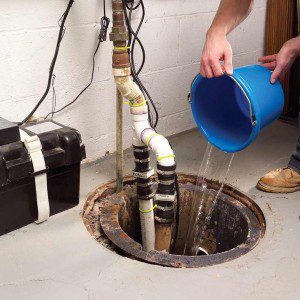
After removing the sump cover, take note of the amount of water in the sump. If the water is low or non-existent, pour a 5ga bucket’s of water into the sump pit and see if the unit works.
Note : The second method can be used for sump pumps with floats as well but not only is it more cumbersome, but can also lead to flooding if it turns out that the pump is not working since the water will continue to sit in the sump until such time as it is either scooped out or the pump is replaced. For water-based backup units and any others that do not have a float, though, it is the only testing procedure.
The Thorough Testing Process:
Thorough testing should be carried out only on sunny days when no rain has been predicted for at least the next 48 hours. Protective clothing, including eyewear and gloves, must be used during such testing. For convenience, we’ve divided the procedure into two parts – pump testing and peripherals testing. Note that highly experienced professional inspectors will sometimes open the sump pump housing and check internal components. This however, requires knowledge of electrical circuitry, and if you do not have such knowledge, it is best not to try to open up the housing.
To proceed with testing:
Remove the sump cover and disconnect all power to the sump pit. Check for any insects or worms in the sump.
Disconnect the pipes and take out the sump pump. If your pipes do not have union connectors or other easily removable connectors, you may have to cut through the pipe to take out the pump. Once you have learned how to test a sump pump, you would need to replace the cut pipes with new PVC units and necessary connectors. This makes the procedure costly, but since it is a one-time task, the chances are that you would be thanking your foresight the next time you need to take out the pump.
Clean out any debris that may be sticking to the pump. You may clean out the dirt and fibers sticking out of the impeller, but this is a time-consuming process and not strictly necessary part of learning how to test a sump pump.
Leave the unit to dry out.
In most cases, the pump’s discharge should have a length of PVC pipe still connected to it, this being the part that connects the discharge to the check valve. Place the pump in a large bucket and put the power cord in a manner that the ends are not exposed to water.
Fill the bucket to the height of the pipe.
Connect the power cord to a powerpoint. The unit should start running immediately, pumping out water from the stub PVC pipe. While it is not possible to measure the rate of water removal (especially since the water would be falling back into the bucket), the intensity of the water’s flow should be a good indicator of the vitality of the pump.
Cut the power and remove the sump pump from the bucket.
Observe the float and switch assembly and gently raise the float a few times. There should be a soft click sound every time. If the operation is not smooth, move the float sideways a little before trying again. If the motion is still not smooth, you may need to carry out sump pump repair. Next, use a flashlight to observe the impeller carefully. Try to rotate the axle of the impeller gently and see if the movement is erratic or unbalanced. Any rusting, bending or damage to the blades must be corrected through replacement of the impeller by a qualified professional.
Lastly, take note of the bearings of the unit and the epoxy coating (if present). Any signs of wear and tear or rusting should also be a cause of concern.
Replace the sump pump in the sump and reconnect all connectors and PVC pipes.
Reconnect power and change the sump cover if you wish to check only the sump pump. If you want to carry out a complete check, though, you would need to test the various peripheral units as well. To do this, you need to check the following components:
GFCI: A GFCI is a circuit component that prevents electrical shocks. If your sump pumps have a GFCI installed, ensure that it is properly connected to the sump pump circuit and furthermore, that there are no signs of wear and tear.
Power Connectors: Sump pumps draw huge power during operation and hence, it is important that their insulation is in top shape. Check the outer insulation of the power cords to ensure there is no damage. Further, make sure the power cord and the adapter/plug are properly connected, as improperly connected units can make the basement prone to fire hazards.
Sump Pit (should be carried out before replacing the pump in the pit): Use a flashlight to note the relief of the base of the pump. Not all debris is removed by the impeller and the ones that remain collect at the bottom. You can use a shovel to remove this debris and make the base plain. Also, check the sides of the pump for any damage or rat holes.
Conclusion:
As the above guide to learning how to test a sump pump would suggest, testing is not merely the task of checking if the pump itself is working properly. Indeed, inspectors are expected to test the sump, the external electrical components and sometimes, even the external drainage pipes involved. Here, we’ve simplified the procedures to allow novice users to run tests like professionals and keep their basements safe while saving the money that you would normally have spent on the plumbing inspector.
Click to check out our Best Sump Pump Reviews Guides


