
Considering the fact that the sump pump is vital to the security and hygiene of you and your family, it is important to know how to install and test a sump pump. It is true that the best sump pump is not one that malfunctions frequently, and therefore requires change. However, it is better to be safe than to regret not knowing how to install a sump pump when there is a storm/heavy rainfall, and you find yourself emptying out the flooded basement using buckets.
Do you need a plumber to install a sump pump?
No, you don’t! The good news is that the sump pump installation is one of the simplest home improvement tasks to learn, and if you have made adequate preparations, you can have the sump pump installed in less than two hours. Of course, local building codes and plumbing guidelines have to be followed, and in case you have an old sump, you may need to consult an official or expert regarding the legality of the old setup.
That said, in all but the oldest homes, the structure of the house and the drainage systems are remarkably similar, and therefore, a single procedure can suffice for the vast majority of homes. To make your work simple, we have compiled a simple step by step guide telling you how to install a sump pump.
Before you go ahead and buy the sump pump though, you need to know whether you have a sump or whether you need to make one. In case you have a sump, you can skip directly to the installation section of this guide. In case you don’t have the sump, however, you would need to make one. This is a slightly lengthy process, but should be done in about 24 hours.
How much does a sump pump replacement cost?
There are a variety of different pump types and sizes that are available for different needs so it’s difficult to say how much a replacement will cost. If you live in an area that regularly sees a lot of heavy rainfall and know that you will need to pump a lot of water it makes sense to look at more expensive and heavy duty models like the Zoeller 98-0001. On the other hand if you think you won’t have a lot of water to remove or are okay with replacing the pump sooner (maybe you are planning to move soon?) you can of course get something much smaller. One of the most popular sump pumps is the Zoeller M53, but all pumps come with different features too that may make them cost more or less depending on what your needs are.
What is the labor cost to replace a sump pump?
The cost for you to get a plumber to come out and install your pump largely depends on your time line and the availability of plumbers in your area. If you are needing a plumber to install a sump pump tomorrow and there are very few local to you it might cost you much more than if you can be more flexible about when the job happens or if you happen to live in an area that has a lot of plumbing services available. Finding someone near you that can replace your sump pump can be difficult unless you have a business directory or know someone who can make a referral. Fortunately for you, you don’t actually need to get a plumber to help as you can install it yourself relatively easily by following the steps below.
If you need to install a new basin, make sure to take adequate preparations
- If you need to install a new basin (the basket that collects water under your basement floor), inquire whether your house is placed on a gravel layer. This information can usually be had from the builder (in case of a new house) and from the neighbors (in case of an old house). If it is, the task becomes much simpler, since gravel can easily be penetrated and removed using standard household tools. If there is rock underneath, however, you may need to consult a professional driller or construction worker to make the sump.
- Decide where you want the sump to be. It is advisable to maintain at least 8”gap between basement walls and the sump, or otherwise the foundation footing may be damaged while drilling. The sump should ideally lie in the lowest part of the basement, but unless you have contact with the builder or can hire a professional, finding out the basement gradient can be a difficult task. In this case, use rough calculations to figure out the lowest area, and then decide whether that area will have easy access to pipe outlets and power supply.
- Once an ideal spot satisfying the three parameters – low basement level, outlet proximity and power supply proximity – has been found, you need to procure a sump liner. Sump liners are usually made of PVC and resemble plastic cylinders. They may have smooth or ribbed edges, and may come with holes pre-fabricated into it. In case they aren’t, a standard drill can be used to make holes at regular intervals over the entire surface. However, the holes must never be larger than the average size of gravel (1/2” diameter), or they will allow gravel to enter and clog the pump.
- Place the sump liner vertically on the spot where you want the sump. Looking down vertically into the area enclosed by the hollow sump liner, trace the outer circumference using a marker or chalk. Leaving the sump liner in its place, trace another circle 3 or 4 inches away from the sump liner line. You should have two concentric circles now.
- Locate the pipe exit of your choice and prepare it for a 1-1/2” PVC pipe. Preparation may include widening the diameter of the pipe and attaching necessary fittings to hold the pipe of your choice.
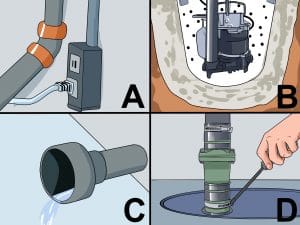
A. Get the pipes ready
- Take the PVC pipe and place it within the exit. It should not press against the other pipes, or they may malfunction later. Do not attach any fixtures to the pipe just yet.
- Decide how long a pipe you’d like. Generally, a 10’ PVC pipe is sufficient for taking the water up the wall of the basement and drain it just outside. However, it may not be sufficient to drain the water just outside the house, and in this case, the pipe will have to be extended on the outside for 4-6’, such that the water can drain out at a safe distance. In deciding this distance, it would be wise to inquire into the laws regarding draining water. At the other end (sump pump end) the pipe should be suspended a little above the floor.
- Once you are satisfied with the attachment, you could test it out once if you have a sump pump. Take a drum of water and place it in the area where your sump markers are. Place the sump pump inside it and attach the PVC pipe to the discharge. Turn on the sump pump and see if the water is being drained. Do not run the test too long, since you have not yet fixed the pipe, and massive water pressure may dislocate it.
- If you are satisfied with the pipe assembly, attach the fixtures and/or glue to keep the pipe in place.
B. Dig out the sump pit for your pump
This may have already been done for you if you are just replacing the pump. Otherwise if you are installing a new pit to put the pump in follow the instructions below.
- Take an electric jackhammer and begin drilling into the concrete along the line of the outer circle. This is a time consuming task and you will need to remove the debris as it is dislodged. Keep going till you have made a hole deep enough to fit in the sump liner. By this time you would have cut through the concrete and reached the gravel level. Keep going for another 8 to 12 inches below the sump liner’s bottom. Make the edges even, such that the sump liner can sit in the sump without any awkward projections compressing its sides.
- Take the liner and put it in the hole, such that it sits comfortably and absolutely vertically. Fill in the sides and the area below the sump liner with gravel.
- Mix concrete and fill in the space between the sump liner’s upper rim and the hole’s circumference (which would correspond to the inner and outer circles respectively).
Note – For those who already have sumps, it is likely that there is or was a sump pump. There should be pipe attachments available for such sumps, and if they are, all you have to do is check their state. If not, you may have to go through steps 5 to 9.
Congrats, the sump pit is ready. Now you have to install the pump!
C. Placing the sump pump and testing
- If you have followed the above procedure, you should have a sump with good internal diameter. If you already had a sump however, before you learn how to install a sump pump, you should see whether the sump is narrow or of decent width. If it is narrow, sump pumps with large floats may not be a good option. Indeed, to decide on a good sump pump for the type of sump you have, it is important to read sump pump reviews in detail.
- Once you have purchased the sump pump, attach it to a power outlet and gently raise the float or switch to the level required to turn on the motor and see if it is working properly. You could also check its functionality using a large bucket or the drum test for piping mentioned above.
- Take the sump pump and lower it gently into the sump, till it is sitting on the base of the sump. Make sure that the base is even, and the sump pump is placed in a stable position with no parts in contact with the sides.
- Connect the discharge of the sump pump to the pipe. It is very likely that the outlet pipe will need a further attachment of PVC pipe to reach the discharge. In this case, it would be a good idea to install a secondary check valve at this location. Check valves are instruments used to ensure that the water which remains in the pipe does not flow back, causing the motor to run endless on/off cycles.
- When attaching the outlet pipe to the discharge, attach the primary check valve at the intersection of the pipe and discharge.
- Connect the power supply of the sump pump.
- To test it, pour water into the sump till it is just above the level required to start the sump pump.
- If the motor runs fine and the water is pumped out successfully out of the outlet pipe and into the drain outside, you can congratulate yourself for having successfully learnt how to install a sump pump.
A sump pump can provide added protection to any basement from water damages caused by heavy rains and floods. When it comes to installing sump pump, it needs careful planning and hard work so that you can reap benefits completely out of it.
D. Installing a cover (optional)
Once you have a sump pump in the basin and all of the plumbing connected you can now decide if you would like to install a cover on top of the pit. The cover can help to prevent radon gas from entering your house and can also help insulate the basement or whatever space the sump pump is. Additionally, the cover can help make the space look nicer because you won’t be looking at an ugly and dirty sump pit, and can help to prevent from things falling into the pit that you would need to retrieve (I wear these heavy duty nitrile gloves everytime!). Finally they can also help to reduce or at least muffle the noise that your pump makes if it is submerged.
The cover you choose to get will contain it’s own instructions on how it should be installed, each of them are different. Some will just sit on top of the pit and others need to be siliconed into place and have cement screws holding it in place.
Step By Step Guide For Installing Submersible Sump Pump
- Decide On The Perfect Location
The sump pump should be placed in the effective location than simply choosing the convenient one. In order to find out the good spot for the sump pump, you should choose the area which is lower than the floor level. It is also important to decide on the one which is located with close proximity to discharge area. This helps you to install pipes to pump out and discharge the water safely.
- Installation Of Power Supply
The sump pump should be connected to the GFCI outlet without any extension cord. So, it is recommended to use dedicated circuit for the pump so that it does not face any demand in power. In case you don’t have any GFCI outlet, you can contact the licensed electrician to install the wiring, breaker and outlet for pump installation.
- Dig A Pit For Sump Pump
First of all, you should break up the concrete in the area where you need to install the sump pump using sledge hammer or jack hammer and masonry chisel. Then all the debris should be removed to create the spot for the basin. It is better to dig a hole around three to four feet deep from the basement floor. You can consider using a shovel for digging the pit and can spread gravels at the base of pit.
- Installation Of Sump Basin
Then you have to wrap the basin’s exterior with filter fabric to prevent any sort of clogging. Then place the basin in its position to ensure that its top and the surface of the floor are in the same level. If the level is not equal, you can dig the hole deeper and add more gravel to the hole. You should also add more gravels to the outside of the sump basin.
- Fixing Discharge Pipe
You can use PVC pipe that suits the size of sump pump as the outlet pipe for discharging water from the pump. You have to dig the pilot hole under the basement for the PVC pipe. You should measure the length and cut the pipe to the appropriate length and join them with PVC primer and adhesive. You can use the extending pipe to divert discharged water away from your residence’s basement.
- Installation Of Sump Pump
While installing sump pump, you should follow the manufacturer’s instruction. The pump can be placed on the top of the gravel bed or on the floor of sump basin. When placing the pump in the middle of the basin, make sure that it does not touch any wall and interfere with its functionality.
With the help of check valve, you can prevent flow of water back into the sump pit and pump. You can use the clamps and fittings to position the check place in its place. Then you have to connect the sump pump to the power supply. In order to test the efficiency of the pump, you can add water to the pit to ensure that the motor gets activated when the water reaches the specific level. Once you have installed the pump and checked its operation, you can cover the basin.
Installing the sump pump demands skills and labor intensive to ensure that the installation has been done with utmost perfection.
Conclusion
The above procedure, rather lengthy though it may seem, should not take more than 24 hours, including the time to make the sump. Of course, you are free to make modifications once you have learned the basics of how to install a sump pump. But as we mentioned in the introduction to this article, the procedure is meant to cover the vast majority of houses, and it is unlikely that you will go wrong with this procedure.
Check our sump reviews
Top 5 Battery Back Up Sump Pump


